Thursday, March 12, 2015
Automating business processes with Google Apps Scripts
For example, your company can create a site for employees to browse and register for training sessions and career development programs. On the page describing each training session or class, you could add a “Register Now” button, which would automatically add registrants to the class roster, add the details of the session to each participants Google Calendar, and email users to confirm enrollment. All of these automated actions can be driven by a script embedded in the site.

Starting today, you can create, edit, and launch Google Apps Scripts from any Google Site, which allows you to automate business processes that involve multiple applications. As in the example above, an Apps Script function can automate tasks such as sending emails, scheduling calendar events, creating and updating site pages using data from other systems, and more.
You can build a script by clicking “More actions” > “Manage site” > “Apps Scripts.” Once you’ve added a script to your site, you can add links or buttons to trigger the script from any page. For tips to get started with scripts, visit the Google Apps Script site.
Want to weigh in on this topic? Discuss on Buzz
Tuesday, March 10, 2015
Instant voting with Apps Script
From nations choosing presidents to offices selecting which coffee to brew, we often find ourselves involved in election systems designed to choose the best option. This spring my alma maters solar vehicle team, CalSol, needed to elect new leaders. Our previous system was painfully slow, involved "raising hands" in a room, and excluded any team members who could not attend a specific meeting. I set out to solve these problems and the result was an easy method for running fair elections in a matter of minutes.
I was able to build the system completely on Google products and technologies:
- Google Forms: Allows members to submit their votes from anywhere.
- Google Spreadsheets: Makes it easy to audit the votes and configure the system.
- Google Apps Script: Simple way to access the results and determine the winner.
I used a lesser known voting system called instant-runoff voting (IRV), or the alternative vote, which asks voters to rank candidates rather than cast a single vote. These votes, along with a secret voting key which I provided to each member, are recorded with a Google Form that automatically populates a spreadsheet. The code in Apps Script looks through the spreadsheet to count the votes while ensuring that each voting key is only used once. The secret keys not only prevent voters from casting multiple votes, but they also allow voters to change their vote by submitting the form again.
Below is a simplified snippet of code that shows the general process used to calculate the winner.
/* Some code omitted for clarity */

/* candidates is a list of names (strings) */
var candidates = get_all_candidates(results_range);

/* votes is an object mapping candidate names -> number of votes */
var votes = get_votes(results_range, candidates, keys_range, valid_keys);

/* winner is candidate name (string) or null */
var winner = get_winner(votes, candidates);

while (winner == null) {
  /* Modify candidates to only include remaining candidates */
  get_remaining_candidates(votes, candidates);
  if (candidates.length == 0) {
    Browser.msgBox("Tie");
    return;
  }
  votes = get_votes(results_range, candidates, keys_range, valid_keys);
  winner = get_winner(votes, candidates);
}
Browser.msgBox("Winner: " + winner);
I learned that putting a little effort into Apps Script can make people happy and save a lot of time. The team feedback was outstanding. One CalSol member said the process was an "Excellent, clean, and professional voting process. This should become a standard [for the team]." I was elated when I was able to close the polls during a meeting and announce the winners of twelve independent elections in just a matter of minutes.
If you like, you can watch a video demonstrating how to create and run your own election using this script:
Try the script yourself to make sure your coffee preferences are heard!
 | Chris Cartland profile | GitHub Chris is a Developer Programs Engineer based in Mountain View on the Google+ team. He previously worked on solar vehicles at UC Berkeley and wants developers to write software that makes our lives better. In his spare time he likes to play soccer and throw the ball in after doing a front handspring. |
Monday, March 9, 2015
Expensify Accelerates Sign ups with the Provisioning API
Expensify does expense reports that dont suck by importing expenses and receipts from your credit cards and mobile phones, submitting expense reports through email, and reimbursing online with QuickBooks and direct deposit.
The Foundation: Single Sign-On
We were really excited when Google approached us to be a launch partner for their new Google Apps Marketplace because tons of our customers use Google Apps -- including us! We have long wanted to put an Expenses link up there next to Mail and Documents, and now we had our chance.
To do that, we installed the JanRain PHP OpenID library with the Google Apps Discovery extension. We’d already implemented Gmail OpenID and ironed out the kinks related to having multiple logins to a single account, so implementing this was a very straightforward process.
Lessons Learned
We quickly learned that while single sign-on is awesome, there was a high drop-off rate among admins installing Expensify into their domain. Digging deeper we determined it was due to the setup process being split: part of the setup was done from within Google Apps, but the final part had to be completed by signing in to our site. Not only that, a major part of the setup process was laboriously entering their employee’s emails. We decided to address each in turn by creating a setup wizard and importing the domain’s email list. We approached this change in two major ways:First, when the Google Apps admin installs the Expensify application, we created a custom configuration step that creates what we call an expense policy. This governs everything from who is part of the company, who can approve expenses, and ultimately who exports to QuickBooks to keep the general ledger in check. Previously this step had to be done after the application was already installed, usually when the admin first signed in. By making this step part of the install process, the entire setup felt much more intuitive and resulted in a higher completion rate.
Second, we used the Zend framework to connect to the Google Apps Provisioning API to fill the new expense policy with a list of all existing employees. This saved a ton of typing and resulted in a vast reduction in the time it took to deploy Expensify to the full company. With everything else in place, the code we used to do this looked something like this:
$oauthOptions = array(All of the users’ names and emails are presented in a table of employees that the person installing the app can use to set roles and quickly build an approval tree for all expenses.
requestScheme => Zend_Oauth::REQUEST_SCHEME_HEADER,
version => 1.0,
signatureMethod => HMAC-SHA1,
consumerKey => $CONSUMER_KEY,
consumerSecret => $CONSUMER_SECRET
);
$consumer = new Zend_Oauth_Consumer($oauthOptions);
$token = new Zend_Oauth_Token_Access();
$httpClient = $token->getHttpClient($oauthOptions);
$service = new Zend_Gdata_Gapps($httpClient, $domain );
$users = $service->retrieveAllUsers();

Once the setup is completed, we automatically create accounts for all of the selected employees and send out a brief email with tips to get started.
Results: 3.5x more users sign up
Overall it was a fast and painless process, has increased the flow of high-quality leads, and has accelerated their rate of converting into real users. Domain admins now sign up 3.5x more users right away than they have been using the previous two-part setup! Feel free to install our app to see how the setup process works, and respond to this post with questions about your implementation -- well try to help out as best we can. And of course if youre still doing your expense reports the old sucky way, please come visit our website (Expensify.com) and wed be happy to help ease your pain. Thanks for reading, let me know if theres anything I can help clarify!Want to weigh in on this topic? Discuss on Buzz
Sunday, March 8, 2015
How Atlassian integrated with Google Apps Part 2
Part 2: Three hurdles to integrating Google Talk with JIRA Studio
In a previous post, I described how we came up with the idea for the JIRA Studio Activity Bar as part of our Google Apps Marketplace and JIRA Studio integration. Things were going pretty well. We were able to get data from Google Apps using the Google Apps data APIs using OAuth for authorization. We were able to connect to the Google Talk servers and retrieve a users buddy list and get buddy updates. We could send and receive messages to buddies. More importantly, we were able to do it in a scalable way using Comet techniques, such as long-polling.You didn’t think it was going to be that easy, did you?
Things were going well. Which is to say, the ground hadnt yet fallen out from under us. That is, until someone on the JIRA Studio team realized that even though we were deploying to Tomcat 6 and using Atmosphere to take advantage of asynchronous IO, we werent really going to be saving that many resources. He explained that the standard Studio setup is to run all our application servers behind Apache. Ok, thats typical enough. Whats the big deal? Well, apparently Apache can be a bit of a resource hog.Your asynchronous IO is nice and all, but…
The Studio Apache configuration uses prefork mode. Each of those Apache processes takes up about 20MB. And since Apache uses blocking IO, all the effort to scale on the application server side might be for nothing if we tied up a bunch of Apache processes that would eat up the limited amounts of memory available. We discussed switching to using a worker threads configuration, but decided it didnt really buy us that much in savings. We suggested deploying all the applications behind a web server implemented using asynchronous IO, like Nginx, but that would have been too big a configuration change to make without adequate time to test.Finally, we hit upon a solution. We can just have browsers connect directly to the application server that the ActivityBar webapp was running on! All the regular Studio apps could continue running at
http://yourcompany.jira.com/ and the ActivityBar webapp would run at http://yourcompany.jira.com:8000/ or something similar. Users wouldnt care because the ActivityBar webapp is only ever accessed in the background. Ok, we can put that issue to bed.You cant do that!
Wait, whats that, you say? Oh no, youre right! Now were violating the same origin policy that we had been able to avoid before! Hold on a second, though. If my memory serves me correctly, I remember seeing a solution to this very problem when we were working on the new OpenSocial-based dashboard system in JIRA 4. There is an RPC system that allows the gadget - an iframe which in some circumstances is loaded from a different origin than the container - to send messages to the container. It has about 5 different implementations for all the different variations of browsers that are out there - it useswindow.postMessage on all the latest browsers that support it, some funky VBScript for IE 6 & 7, a few other techniques for older Gecko and Webkit, and the fallback method using nested iframes. Could we use that? Its been developed and battle-tested by Google developers, and it would fit our needs perfectly. But how easy would it be to just drop it in?
As luck would have it, the Shindig RPC JavaScript code can be pretty easily adapted to run outside Shindig. All we needed to do was create an iframe that is loaded from the ActivityBar webapp, use that to do all of our Ajax requests and long polling with the ActivityBar server, and use the adapted Shindig RPC system to send messages between the application page and the iframe. Phew, disaster averted.
But wait, what about…
The HTTP spec, section 8.1.4 specifies that a "single-user client SHOULD NOT maintain more than 2 connections with any server or proxy." Most browsers these days tend to stretch that number to a maximum of 8 connections. IE6 and IE7 still respect that 13 year old suggestion, so if a user opens more than two windows or tabs to their instance of Studio, each with the ActivityBar running, in IE6 and IE7 that will eat up all their connections and additional windows or tabs will appear to hang while they wait for a connection to be available. But wait, it gets better! If your Studio usage habits are anything like mine then you typically have 6-10 tabs open with issues, issue searches, reviews, wiki pages, etc. So even on browsers where that limit is stretched, youre likely to run into the same problem.A bit of research turned up a number of workarounds, but the one we chose was to use multiple subdomains. Since we had already done the work to solve the same origin policy we didnt need to worry about that, it would "just work". The big question to answer was whether or not wed be able to make this change in our deployment environment on such short notice. The guys over at Contegix came through for us on this one and got the deployment environment for JIRA Studio modified to setup the DNS aliasing that we needed. Now, if you look in Firebug or other web browser debugging tools, youll see connections being made to
http://chat1234.yourcompany.jira.com in one tab and http://chat4321.yourcompany.jira.com in another.Now that that is over…
Phew! We can finally step back and enjoy the fruits of our labor! Those were some major technical hurdles that we had to learn about and overcome in a short amount of time. Its hard to believe all that took place in the short span of a few months. Everyone at Atlassian and Contegix really pulled together nicely to make it all happen. And, again, special thanks to Jean-Francois from the Atmosphere project for rapidly fixing bugs that I reported!But like most projects, just went you’re ready to step back and enjoy what you’ve built, you’re off to the races on future iterations. We installed this on our Studio instance so we could dogfood it and already have plenty of ideas for improvements, including:
- More quick add links: weve got a quick link so you can insert, into your chat, a link to the current page youre on with a single click. On the "Upcoming Events" Google Calendar tab there is a "Quick add" button. But we can also add ‘quick add” links for issues, wiki pages, and other convenience functions.
- Auto IM Translation: a nifty feature Google makes available to us, and we’re excited about putting it into action.
- Streaming application updates: right now the application feeds are fetched from the browser when they are needed and they are only fetched once to avoid sending 7-8 spurious HTTP requests. It would be much cooler if the ActivityBar webapp made these requests on behalf of the browser and, using the communications link already established, sent updates as they were found. Then you could sit on your JIRA dashboard and have continuous feedback on everything going on in your project.
- Installable on your own servers!: one goal in all of our integration work with Studio is to make it possible for behind-the-firewall customers to take advantage of some of these features. There is a little bit of work in the ActivityBar webapp itself that still needs to be done to make this possible - were currently hard-wired to connect to the Google Talk servers, for instance. Most of the effort to make this work in behind the firewall settings will need to be done in the apps themselves. We had to customize each application to get the ActivityBar to show up on every single page across every single app, something that isnt possible with the current plugin system in our applications. Something that comes close is Web Resource Contexts in Confluence, but there are a few additional bits of information that are required that cant be provided purely as web-resources. But stay tuned, because if we do that it will most likely be pluggable - like all Atlassians other apps - and youll be able to add your own application tabs!
We’re pretty excited about what we’ve built, and even more excited for developers and software development teams inside companies using Google Apps to give JIRA Studio a try. We think you’ll enjoy the work we’ve done. Check it out at http://www.atlassian.com/google.
Monday, March 2, 2015
Raising Butterflies with a HUGE surprise!!!


It was a really fun unit... we released our butterflies into the while and I thought we were done...
UNTIL....
I looked in the butterfly container and saw hundreds of blue things. "Blue what?" you ask!? Blue EGGS!!! I asked a bunch of people who have done this before (because of course this was my first time raising butterflies) and no one had that happen before.
Well... lo and behold, I get to school one morning last week and there are HUNDREDS of tiny caterpillar larva EVERYWHERE!

You see those tiny black 2 millimeter big specs? Well... they move. They are actually tiny little baby caterpillars!

You wouldnt know it... but they are FAST. Within a few hours, they were ALL OVER my desk. I kid you not. See those little buggers!?

Today my para and I spent an hour collecting these little larva and putting them in containers so they wouldnt climb all over my desk anymore! It felt like it lasted for an eternity!

We saved at least 100 of them...

Now.. its time to spend another 2-3 weeks caring for these little babies... check out this video. How cute are their little legs!?!?
Go figure this is my luck the very first time I raise butterflies! Has any one else had this happen to them!?
Wednesday, February 18, 2015
MS Office 2013 Professional Plus Full Version with Serial key

Microsoft Office 2013 (formerly Office 15[6]) is a version of Microsoft Office, a productivity suite for Microsoft Windows. It is the successor of Microsoft Office 2010 and includes extended file format support, user interface updates and support for touch among its new features.[7] Office 2013 is suitable for IA-32 and x64 systems and requires Windows 7, Windows Server 2008 R2 or a later version of either.[8] A version of Office 2013 comes included on Windows RT devices.[9]
Development on this version of Microsoft Office was started in 2010 and ended on October 11, 2012 when Microsoft Office 2013 was released to manufacturing.[10] Microsoft released Office 2013 to general availability on 29 January 2013.[1] This version includes new features such as integration support for online services (including SkyDrive, Outlook.com, Hotmail, Skype, Yammer and Flickr), improved format support for Office Open XML (OOXML), OpenDocument (ODF) and Portable Document Format (PDF) and support for multi-touch interfaces.
Microsoft Office 2013 comes in twelve different editions, including three editions for retail outlets, two editions for volume licensing channel, five subscription-based editions available through Microsoft Office 365 program, the web application edition known as Office Web Apps and the Office RT edition made for tablets and mobile devices. Office Web Apps are available free of charge on the web although enterprises may obtain for on-premises installation for a price. Microsoft Office applications may be obtained individually; this includes Microsoft Visio, Microsoft Project and Microsoft SharePoint Designer which are not included in any of the twelve editions.
Features
Office 2013 is more cloud-based than previous versions; a domain login, Office 365 account, or Microsoft account can now be used to sync Office application settings (including recent documents) between devices, and users can also save documents directly to their SkyDrive account.[18]
Microsoft Office 2013 includes updated support for ISO/IEC 29500, the International Standard version of Office Open XML (OOXML) file format: in particular it supports saving in the "Strict" profile of ISO/IEC 29500 (Office Open XML Strict).[19] It also supports OASIS version 1.2 of ISO/IEC 26300:2006, Open Document Format,[20] which Office 2013 can read and write.[21] Additionally, Office 2013 provides full read, write, and edit support for ISO 32000 (PDF).
New features include a new read mode in Microsoft Word, a presentation mode in Microsoft PowerPoint and improved touch and inking in all of the Office programs. Microsoft Word can also insert video and audio from online sources as well as the capability to broadcast documents on the Web.[22] Word and PowerPoint also have bookmark-like features which sync the position of the document between different computers.
The Office Web Apps suite was also updated for Office 2013, introducing additional editing features and interface changes.
Other features of Office 2013 include:
Flatter look of the Ribbon interface and subtle animations when typing or selecting (Word and Excel)
A new visualization for scheduled tasks in Microsoft Outlook
Remodeled start screen
New graphical options in Word
Objects such as images can be freely moved; they snap to boundaries such as paragraph edges, document margin and or column boundaries
Online picture support with content from Office.com, Bing.com and Flickr (by default, only images in public domain)[clarification needed What kind of support?
Ability to return to the last viewed or edited location in Word and PowerPoint
New slide designs, animations and transitions in PowerPoint 2013
Support for Outlook.com and Hotmail.com in Outlook
Support for integration with Skype, Yammer and SkyDrive
IMAP special folders support
System Requirements:
Processor running at 1 GHz minimum,
1 to 2 GB of RAM (depending on architecture, 32 or 64 bits),
3 GB of disk space
DirectX 10 compatible graphics card
Screen Shots: Click on the image to view large
 |  |  |
Friday, February 13, 2015
Fork Bomb Crush Computer Very Badly With a Single Notepad File
 |
| Crush Computer With Notepad File |
Another classic, A fork bomb is the equivalent of a DOS attack on your own system. It aims at depriving the system off its Random access memory, leaving none for vital functions required to keep the systems running, hence crashing it. Just 5 characters long, the fork bomb is not Deadly to a computer, Just annoying.
As with the previous batch file virus tutorials, all you need to do is open up notepad, type and save the following code as a batch file, that is with extension .bat
%0|%0
(That was it.)
Technically, the above 5 characters are short for the following more comprehensible code :
:s
start %0
goto s
Here, the first line creates a sort of checkpoint called s. It can be used to bring the programs pointer to a specific command, as is done here by using goto in the last statement. %0 is actually the name of the .bat file itself. So every time the loop is run another instance of the same program is called and then both of them run together, to again duplicate themselves.
If that seems too simple to cause any trouble, read on.
Every program doubling itself is a form of exponential growth. After one iteration of the loop, two programs are created. After another cycle, each of those two create another two for a total of four same programs. After 10 iterations we have 2^10 = 1024 programs. After 100 iterations we have 2^100 = 1.267 nonillion, a number so big you dont even know what nonillion is (Its 10^30).
Even with todays CPUs and RAMs being in the Giga Range(Ghz and Gb), the first program will probably not even complete 50 iterations before running out of memory. Mind you, every iteration would hardly take a few milliseconds , so running this file will almost definitely crash your computer.
Thursday, February 12, 2015
C Program to Print Heart Shape With Happy Friendship Day Message Inside it
Also Read: C Program to Print India Map
#include <iostream>
#include <cmath>
using namespace std;
int main()
{
double x, y, size=10;
char ch=3;
string message(" Happy Friendship Day ");
int print_line = 4;
if (message.length() % 2 != 0) message += " ";
for (x=0;x<size;x++)
{
for (y=0;y<=4*size;y++)
{
double dist1 = sqrt( pow(x-size,2) + pow(y-size,2) );
double dist2 = sqrt( pow(x-size,2) + pow(y-3*size,2) );
if (dist1 < size + 0.5 || dist2 < size + 0.5 ) {
cout << ch;
}
else cout << " ";
}
cout<<"
";
}
for (x=1;x<2*size;x++)
{
for(y=0;y<x;y++) cout << " ";
for (y=0; y<4*size + 1 - 2*x; y++)
{
if (x >= print_line - 1 && x <= print_line + 1) {
int idx = y - (4*size - 2*x - message.length()) / 2;
if (idx < message.length() && idx >= 0) {
if (x == print_line) cout<<message[idx];
else cout << " ";
}
else cout << ch;
}
else cout << ch;
}
cout<<endl;
}
return 0;
}

Wednesday, February 11, 2015
Assassins Creed IV Black Flag for pc full version with crack

Review:
(The ugly portmanteau in the title is because damnable Uplay’s damnable cloud saves system destroyed and rewound over three hours of my progress, which has kept me from getting quite as far into Black Flag as I’d hoped. It also meant I lost a bunch of sea shanties, which was what upset me the most. Is this is Wot I Think? Is it mere Impressions? It’s both and neither. Isn’t that helpful? PS: in the name of all that’s holy, turn off cloud saves in Uplay before you start playing AC4).
It’s the best Assassin’s Creed yet! Which is 90% because Black Flag, a a third-person action adventure about pirates in the Caribbean, isn’t really an Assassin’s Creed game in the traditional sense, and 10% because the lead character is from Swansea.
I went to university in Swansea, you see. It’s a crap town if ever there was one, but I can’t help but be fond of it. Also it’s where I played Half-Life. AC4′s piratey protagonist Edward Kenway has an accent that appears to be on a cycling tour of the British isles, but when it does settle on a Welsh lilt it fits – it fits the rogueish, laddy character, and it fits this much more playful AssCreed. It’s a relief, after the dour AC3. I had thought that game’s joyless hero Connor (Kenway’s grandson, chronologically-speaking) wasn’t going to make any appearance in AC4, but then I realised that the ship’s plank was surely an homage.
Anyway, pirates. I suppose you could argue that they can loosely come under the definition of ‘assassin’, what with all the killing, but let’s not pretend this series has ever had much interest in what that word implies. The secret society and ancestor race bollocks which has made what should have been a light-footed tale tediously heavy is still in some evidence, but the vast majority of it has been downplayed in favour of Just Doing Some Piracy. This also entails an admission, of sorts, of what Assassin’s Creed games are really about – the pursuit of wealth and power, rather than justice and subtlety. This is a game about blowing up every ship that moves for its loot, finding every icon on ever island for its loot and hunting every animal, both on land and at sea, for its skin (i.e. loot). It is greed, it is the celebration of greed, and it is refreshingly unabashed about it. There is a redemptive narrative thread for good ole boy Kenway, whose jack the lad nature decreases somewhat as the game wears on, but really we’re all in it for the yo-ho-ho and the Master and Commander-lite naval battles and blowing up island forts and air-assassinating ocelots (that last is a real in-game mission objective, delivered with an impressively straight face).
While the controls are characteristically convoluted and in some cases discordant (for instance, the run button for on-foot mode becomes the fire cannons! button in ship-captaining mode, which causes no end of trouble), generally it’s a pleasure to take the wheel of Kenway’s ship, the Jackdaw. The naval component is clearly as much like steering a real boat as drinking vodka is like exercising, but even in its cartoonish ease there’s a satisfying weight to turning against the wind, a heft and chaos to unleashing a volley of cannonfire, and a ‘we’re the kings of the world!’ rapture to leading a boarding party onto a defeated enemy craft. When you’re out on the seas, it’s wall to wall destructive celebration. Rad more
System requirements:
Operating System: Windows Vista SP2 or Windows 7 SP1 or Windows 8 (both 32/64bit versions)
Processor: Intel Core2Quad Q8400 @ 2.6 GHz or AMD Athlon II X4 620 @ 2.6 GHz
RAM: 2 GB (4 GB recommended)
Video Card: Nvidia Geforce GTX 260 or AMD Radeon HD 4870 (512MB VRAM with shader Model 4.0 or higher)
DirectX 11: DirectX June 2010 Redistributable
Disk Space: 30 GB available space
Sound Card: DirectX Compatible Sound Card with latest drivers
Peripherals: Windows-Compatible keyboard and mouse required, optional controller (Xbox 360 Controller for Windows recommended)
Multiplayer: 256 Kbps or faster broadband connection
Screen Shots: Click on the image to view large screen
 |  |  |
Nero Burning ROM 2014 Full version with serial or crack

Nero Burning ROM is a comprehensive CD, DVD and Blu-ray disc burning application.
Creating audio and data discs with the program is a matter of drag and drop simplicity. Youre able to build video discs from video folders (if youre looking to build these from video files then youll need Nero Vision Xtra). And you can also copy discs, erase rewriteable discs or work with disk images (.NRG, .CUE, .ISO and .IMG formats are supported) in a couple of clicks.
Thats just the start, though. Nero Burning ROM also includes SecurDisc 2.0 technology, which can be used on any disc burner, and any disc type - CD, DVD or Blu-ray. This automatically adds error recovery information to your discs, so if they become damaged or corrupted in years to come then you may be able to recover the contents. SecurDisc also supports password and copy protection, an integrity check that alerts you to impending disc failure, and more.
A useful new DiscSpan project type makes it easy to archive data across multiple discs. If youre backing up your music collection, say, theres no longer any need to manually arrange the files into single disc-sized groups. Just create a DiscSpan project, drag and drop all the files and folders youd like to archive, and the program will organise them itself to use the minimum number of discs.
Theres also a new AVCHD project type, that archives your high definition footage without spending hours transcoding it. And enhanced Windows support included a new right-click "Burn with Nero" entry, useful Windows 8 jump list options, and more.
The latest version of the app, Nero Burning ROM does not include a huge number of updates, but there is a new SecurDisc Surface Scan feature that can check Blu-ray, DVD and CD discs and provide greater reliability. It is now also possible to import files from the Nero MediaBrowser. Read more
System rquiremtns:
Windows® XP SP3 (32 bit), Windows Vista® SP2 (32/64 bit), Windows® 7 SP1 Home Premium, Professional or Ultimate (32/64 bit), Windows® 8 (32/64 bit), Windows® 8.1 (32/64 bit)
2 GHz AMD or Intel® processor
512 MB RAM (1 GB RAM for Windows Vista® , Windows® 7 or Windows® 8)
500 MB hard drive space for a typical installation of all components (including temporary disk space)
CD, DVD, or Blu-ray Disc recordable or rewritable drive for burning
Third party components such as Microsoft Windows® Installer 4.5 are shipped with the product or automated download if not included in the package
For some services an Internet connection is required
Internet connection charges are the users responsibility
For further requirements please check www.nero.com
Screen Shots: Click on the image to view large screen
 |  |  |
Friday, January 30, 2015
Working with Adobe Premiere Pros Basic 3D Video Effect PART 2
Go to the Effects window (choose Window > Effects from the main menu if you do not see it). You will find the Basic 3D video effect under Video Effects > Perspective. Once you find it, click and drag it down onto the basic_3D title clip on the Video 1 track of your Timeline in order to apply the video effect.

Make sure that your title clip is still selected, then go to the Effect Controls window (choose Window > Effect Controls if you do not see it). You should be able to see Basic 3D under Video Effects. Click the right-facing arrowhead beside the word Basic 3D in order to see the effects properties. You will see 5 items: Swivel, Tilt, Distance to Image, Specular Highlight and Preview.

Lets work with the Swivel property first. The Swivel property controls the clips horizontal rotation. It has two values that you can work with: the number of rotations and the rotation angle.
Make sure that the title clip on your Timeline is still selected. Then in the Effect Controls window, drag the playhead to the leftmost edge of the clips timeline. Then click on the Toggle Animation button beside the word Swivel (its the icon that looks like a stopwatch). This will turn on keyframing for the Swivel property and will automatically add one keyframe to where the playhead is positioned.

Then move the playhead forward by about 1 second and add another keyframe by clicking on the Add Keyframe button. Keep the playhead over that keyframe and change the Swivel propertys angle value. The angle value is the one to the right of the x. Right now, it should be 0.0. Click on it and input a value of 80.

Then move the playhead forward once again by about 1 second and add another keyframe. On this keyframe, change the Swivel propertys angle back to zero.

By now, if you play your movie on the program monitor, you should have something like this:
go back to Working with Adobe Premiere Pros Basic 3D Video Effect PART 1
continue to Working with Adobe Premiere Pros Basic 3D Video Effect PART 3
Repair bootloop or stuck in android logo in your S5280 with Firmware
You need to download several files including the firmware
Odin --> Odin 3.07
Firmware -- > S5280XXAMF1_OXXAME5.zip
Samsung Driver -- > SamsungDriver
"Extract these files in your desired folder"
Installing the driver
1. Install driver first just keep on hitting next.
2. After installing the driver Press and Hold Volume Down + Home Key + Power Button, a selection will appear if you would like to go in Download Mode, Press Volume Up to proceed in Download Mode.
3. Connect your phone in the PC via USB Cable
4. Wait for it to finish installing the driver.
"Note: Sometimes it is better to reboot your PC. After installing the driver."
BEFORE PROCEEDING IN FLASHING MAKE SURE THAT THE BATTERY IS FULLY CHARGED OR 50% CHARGED.
Flashing your Phone
1. Open Odin 3.07
2. Load the following file. PDA, Phone, CSC. No need to overwrite Boot. And its okey to not include the pit file.
PDA --> CODE_S5280XXAMF1_1247256_REV03_user_low_ship.tar.md5
Phone -- > MODEM_S5280XXAMF1_REV03.tar.md5
CSC -- > CSC_OXX_S5280OXXAME5_1236083_REV03_user_low_ship.tar.md5

3. Do not check repartition in option key, copy only what is shown in the picture above.
4. When you are ready to flash your phone, Press and Hold Volume Down + Home Key + Power Button, a selection will appear if you would like to go in Download Mode, Press Volume Up to proceed in Download Mode.
5. Connect your phone in the PC via USB Cable, wait for a value in the ID:COM to appear. It will turn yellow with number example: COM32
6. Press START to proceed flashing your phone. Wait until it is done, the phone will reboot after flashing.
I hope this tutorial help you. Drop a comment if there is something is not clear to you. Cheers! ^_^
Friday, January 23, 2015
PART 1 Creating a new Flash document and choosing a workspace layout Getting started with Flash CS5
- PART 1: Creating a new Flash document and choosing a workspace layout
- PART 2: The document window, the toolbar, and drawing on the stage with the brush tool
- PART 3: Saving your Flash document and knowing the difference between the FLA and SWF files
Welcome to the Getting started with Flash CS5 tutorial series by flashpotential.com. In the first part of this series, where going to learn how to create a new document, and well also get to know a little bit about workspace layouts.
Step 1 - Creating a new Flash document
Launch the Flash CS5 application.
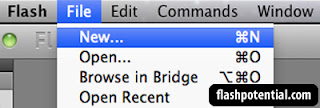
To create a new document, go to the main menu and choose File > New.
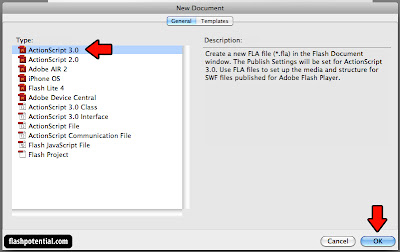
Then from the New Document window, choose ActionScript 3.0, and click OK. Click on the image below to enlarge.
You should now see your new Flash document. Click on the image below to enlarge.

This is your workspace. Its made up of different windows that each have specific functions. Youll see some of those windows highlighted in the image below. Click on the image below to enlarge.
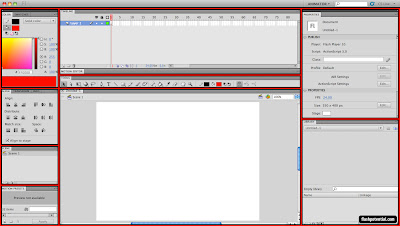
The windows that you see here are just some of the windows that you can work with when you open up a Flash document. Youve got the toolbar, the timeline, the properties inspector, etc... But we wont go through each of them right now. There are a lot! Well learn more about them in the other lessons.
These windows that make up your workspace can be rearranged. You can move them to different locations, adjust the size, you can close some of them, or you can bring up other windows that are not yet visible, etc... The windows that you have open and the way you arrange these windows is referred to as your workspace layout. You can customize your workspace layout or you can choose from any of the preset layouts that are available.
Step 2 - Choosing a workspace layout
To choose a new layout, go to the main menu and choose Window > Workspace. Here youll see all the available layout presets that are available. Youve got Animator, Classic, Debug, Designer, Developer, Essentials and Small Screen.
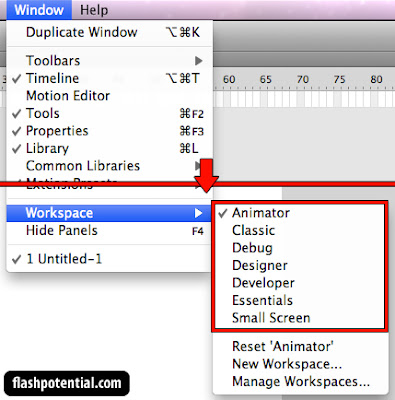
Click on the choices to see how they look like. Youve got the Animator layout, which gives importance to the windows that are most often utilized when one is creating a Flash animation project. Theres the Classic layout, which looks like the default layout of older versions of Flash. Youve also got the Small Screen layout, which creates a workspace ideal for monitors with lower resolutions. Each workspace is designed to fit the needs of a certain type of user. Its a lot like how you fix your own study table or your room at home. You arrange your things in such a way that makes it easier for you to work, relax or play.
Step 3 - Moving, collapsing, expanding and adjusting the size of windows
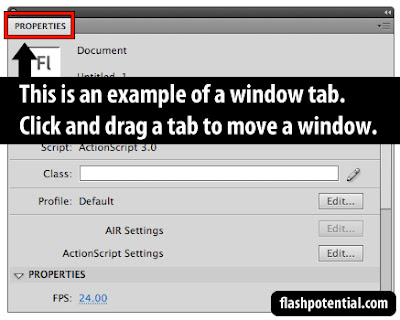
If you wish to move your windows around, you can do so by clicking on the window tabs and dragging the windows to the desired location.
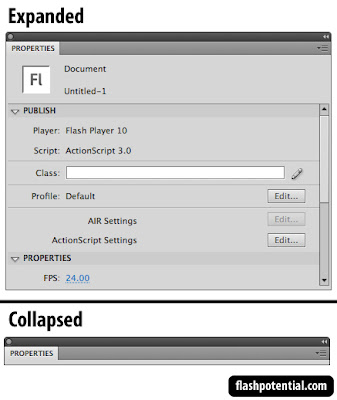
If you wish to collapse or minimize a window, just double-click the tab. To expand a window again, then just double-click the tab again.
If you wish to adjust the size of a window, place your mouse pointer over the edge of the window until the pointer turns into a double-headed arrow.
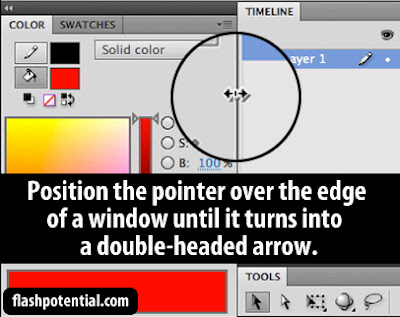
And then click and drag to adjust the windows size. You can adjust from the left or right sides to change the width. And you can also adjust from the top or bottom edges to change the height.
Go ahead and try moving, resizing, collapsing and expanding the windows in your workspace. Dont worry about messing up the layout. Well fix that in the next step.
Step 4 - Resetting a workspace layout
If you find that youve messed up your workspace layout to a point where its quite difficult for you to work, you can reset everything by going to Window > Workspace > Reset [Active Layout].
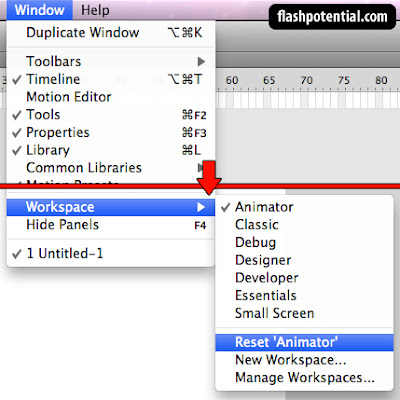
This is going to reset whatever layout is currently active. So if youre using the Animator layout, its going to reset your workspace back to the default Animator layout, and make everything neat and tidy again.
In part 2 of the Getting started with Flash CS5 tutorial series, were going to draw some artwork on the stage.
Working with Adobe Premiere Pros Basic 3D Video Effect PART 5
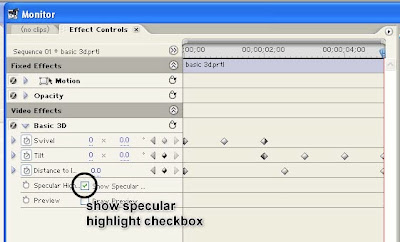
Lets now learn how to add that effect.
Make sure that the "Basic 3D" title clip on the Timeline is still selected. Then in the Effect Controls window, make sure that the Show Specular Highlight property of the Basic 3D video effect is checked. This will add that spotlight effect you saw in the preview above.
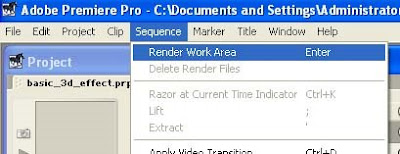
To be able to preview the Specular Highlight, you will need to render your sequence. Choose Sequence > Render Work Area from the main menu in order to render a preview.
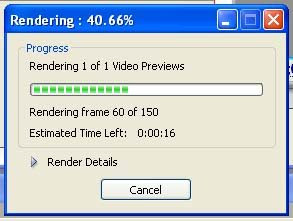
Then just wait for Premiere to finish rendering.
Once rendering is finished, you should be able to view your sequence in the Program view of the Monitor window and see the specular highlight applied.
And that concludes this tutorial on Working with Adobe Premiere Pros Basic 3D Video Effect.
go back to Working with Adobe Premiere Pros Basic 3D Video Effect PART 4