Showing posts with label adobe. Show all posts
Showing posts with label adobe. Show all posts
Thursday, February 5, 2015
Adobe Photoshop CC 2014 Crack Free Download Full Version


Photoshop CC (2014) 64 bit
Smart Object improvements:- - Maintain the links to external files by automatically packaging them in a single directory. You can also convert your existing embedded Smart Objects to linked Smart Objects.
Improved Layer Comps:- - Save time now that you can change the visibility, position, or appearance of one layer in a Layer Comp and then sync that change to all the others. Plus, easily see the attributes of each Layer Comp, and toggle a Layer Comp within a Smart Object.
Blur Gallery motion effects:- Use Path Blur to add blur along any path and Spin Blur to create circular or elliptical blurs. The Mercury Graphics Engine makes all Blur Gallery interactions fast and fluid.
Focus Mask:- Let Photoshop help you start a mask by automatically selecting the in-focus areas of your image. Focus Mask works great with potraits and other images that have shallow depth of field, and the Mercury Graphics Engine delivers fast performance.
Improvements to Content:- Aware technology - New technology in Content-Aware Fill, Move, and Patch smoothly blends areas containing gradients, like skies, so you can create seamless, realistic results like never before.
Smarter Smart Guides:- Forget trying to align multiple shapes or objects at exact distances from one another on canvas. Now you can quickly see the distance in pixels between objects so you can lay out content with precision.
Desktop fonts from Typekit:- Choose the fonts you need from the Typekit library, sync them to your desktop, and get immediate access to them in your Photoshop font menu. Photoshop will even automatically replace missing fonts in your documents.
Font Search:- Search for fonts by name, and see instant previews of each font to zero in on the perfect one.
Expanded 3D printing capabilities:- Now you can see exactly where and how Photoshop repaired your 3D meshes so its easy to refine your designs in third-party 3D modeling apps. Get more accurate renderings of your models prior to printing thanks to WYSIWYG previews. And get support for more 3D printers and service providers.
Adobe Generator enhancements:- Simplify the process of naming Generator assets and get greater flexibility in organizing the output from Generator by setting document-wide defaults, and by specifying subfolders for exported assets. Generator also offers new APIs so developers can create even more powerful plug-ins.
Adobe Camera Raw 8 enhancements:- Heal images, fix perspective distortions, and create vignettes with greater precision. Plus, access an interactive histogram, before/after previews, and more.
Improved Windows 8.1 stylus support:- Get to work quickly and comfortably with your stylus on Windows 8.1 devices, and enjoy smoother brush strokes thanks to higher-frequency sampling.
Expanded Mercury Graphics Engine support:- Upsample images up to 15 times faster (depending on file size and video card configuration) now that the Mercury Graphics Engine delivers an OpenCL performance boost. The engine powers new Blur Gallery motion effects and the Focus Mask feature, too.
Experimental features:- A new preference setting allows you to test drive and help shape new Photoshop features before they’re officially released.
Intelligent upsampling, even faster:- Enlarge a low-res image so it looks great in print, or start with a larger image and blow it up to poster or billboard size. Upsampling preserves detail and sharpness without introducing noise, and now you get even more immediate results thanks to an OpenCL boost from the Mercury Graphics Engine.
Workflow Enhancements:- Work faster and smarter thanks to new feature enhancements throughout your workflows. Now you have access to an expanded Color Panel; you can access your most recently used brushes, sync your workspaces, keyboard shortcuts, and menu customizations with Sync Settings; and more.
And so much more:- Also includes: support for very large PNG files; the ability to export 3D LUTs; support for new video formats including Sony RAW and Canon RAW; and more.
See full Release Notes: Click Here
Photoshop CC 2014 Sysytem Requirments:
- Intel® Pentium® 4 or AMD Athlon® 64 processor (2 GHz or faster)
- Microsoft® Windows® 7 with Service Pack 1, Windows 8, or Windows 8.1
- 2 GB of RAM (8 GB recommended)
- 2 GB of available hard-disk space for installation; additional free space required during installation (cannot install on removable flash storage devices)
- 1024×768 display (1280×800 recommended) with 16-bit color and 512 MB of VRAM (1 GB recommended)
- OpenGL 2.0–capable system
- Internet connection and registration are necessary for required software activation, validation of subscriptions, and access to online services.*.
Click Below to Download its Torrent
Download
Friday, January 30, 2015
Adobe Photoshop CS4 Online Training for Beginners First 3 Chapters FREE
The VTC Online University is a great site that offers high-quality software video training. Check out their Adobe Photoshop CS4 Online Training for Beginners course. Scroll down to watch the first 3 chapters for free. Just click on the video links to launch the free video tutorials. Visit the course details page for more information about this Photoshop CS4 online training course for beginners. The entire course contains a total of 9 hours worth of excellent video tutorials. Sign up for a VTC.com membership in order to view the entire course.
[Become a VTC.com Member]
Get complete access to ALL the VTC Online University courses for $30/month
System Requirements
RAM Requirements
Peripheral Devices
Work Files
Toolbox
Spring-Loaded Tools
Menus
Panels
Shortcuts
Help
Arrangements
Metadata
Organize
Loupe & Compare
Raster vs. Vector
Size & Resolution
Resize Documents
The Canvas
Undo & Step
Drag & Drop
Layer Options
Opacity & Fills
Blend Modes pt. 1
Blend Modes pt. 2
Layer Comps
Adjustment Layers
Layer Styles
Auto Align Layers
Crop & Rotate
Crop Perspective
Navigator Panel
Create Swatches
Color Picker & Eyedropper
Quick Select
Magic Wand
Marquees & Strokes
Paste Into & Invert
Feather & Anti-alias
Save & Load
Content Aware Scale pt. 2
Transform
Free Transform
Warp Tool
Arbitrary Rotation
Curves
Levels
Vibrance Adjustment
Variations
Match Color
Red Eye
Vector Masks
Clipping Masks
Quick Mask
Layer Masks
Refine Edge
Fonts & Colors
Type on a Path
Type as a Mask
Edit Type
Rasterize Type
Dodge / Burn & Sponge
Smudge / Sharpen & Blur
The Eraser Tools
Define Patterns
Brush Preview
Define Brushes
Brush Dynamics
Edit Paths
Vector Shapes
Smart Filters
Blurs
Textures
Lighting Effects
Styles
Liquefy
Fade
Smart Objects pt. 2
Notes Annotation
Camera Raw pt. 2
Clone Stamp
Clone with Two Images
Clone Source
Patch Tool
Dust & Scratches
Art History Brush
History Brush
Vanishing Point pt. 2
Alpha Channels
Play Actions
PDF Presentation
Droplets
Contact Sheets
Picture Package
Web Photo Gallery
Flatten
Export to Illustrator
PDF
File Formats
Slice Options
Save for Web
Websites
Orbiting Mothership pt. 1
Orbiting Mothership pt. 2
Orbiting Mothership pt. 3
Orbiting Mothership pt. 4
Orbiting Mothership pt. 5
Course: Adobe Photoshop CS4
Author: Dwayne Ferguson
Release Date: 2009-01-16
Duration: 9 hrs / 141 tutorials
The Virtual Training Company (VTC) started in Californias Silicon Valley in 1996, and is one of the leading online training providers in the web today. Theyve built up a library of more than 1000 video training courses, which you can access entirely for $30/month.
Heres what some of their satisfied customers have to say:
This site is basically going to save my semester. I will be using it beyond that though. What a great site. Worth every penny. Thank you so much for your product.
- Kevin
My company recently switched out to Outlook 2010, gave us a pamphlet of a few pages covering the very basics. We were lost! Especially coming from Groupwise/Novell. That said, Laurie Ulrich Fuller is an outstanding instructor. This has been the simplest way to explain Outlook 2010. Loved her!!! She made my life easier. Thanks a million!!!
- Celia Esquivel
Geoff Blake performed superbly on introducing Acrobat forms: clear, well-organized and instructive on the basics of the process. Bravo! I would highly recommend this course to anyone searching for a basic introduction to Acrobat forms.
- Brad B.
Over the course of a few weeks, I received approximately 60 hours of on-line Project Managent training from Vanina Mangano through VTC. The training was for Project Management certification exam and I took 3 courses PMBOK (a bootcamp like course), PMBOK Schedule and PMBOK Risk. Vanina really prepared me for the test. I particularly found the Schedule and Risk Bundles instructive in expanding my intuitive understanding of these overall processes. Vanina did a great job of performing the training and her commentary and explanations were right on. Vaninas melodic voice is easy to listen to - she motivates and encourages study. I passed the Project Management Certification on my first try after completing this course of study. Top qualities: Great Results, Personable, Good Value
- Annemarie DeMarco
I joined on the 20th August 2010 to your program and Im most impressed. I need to learn Excel for my job and at 64 years old I never thought I would ever be able to conquer spreadsheets etc. I have been practicing along with your tutorials since Saturday and I cant believe how quickly I am picking it up. The online course is worth every penny and I will be recommending you and your team for the excellent service and content to anyone who will listen. Magic! By the way Im not that great on a computer either so if I can do it, then its a doddle for anyone else!
- Barbara Richards
Are you ready to start your Adobe Photoshop CS4 Online Training for Beginners? Then sign up for a VTC.com membership today!
Read more »
Adobe Photoshop CS4 Training
from VTC.com[Become a VTC.com Member]
Get complete access to ALL the VTC Online University courses for $30/month
Adobe Photoshop CS4 Online Training for Beginners
Introduction
New in Photoshop CS4System Requirements
RAM Requirements
Peripheral Devices
Work Files
Interface
Document WindowToolbox
Spring-Loaded Tools
Menus
Panels
Shortcuts
Help
Arrangements
Adobe Bridge
The BridgeMetadata
Organize
Loupe & Compare
Documents
New DocumentRaster vs. Vector
Size & Resolution
Resize Documents
The Canvas
Undo & Step
Drag & Drop
Layers
Add / Delete & MergeLayer Options
Opacity & Fills
Blend Modes pt. 1
Blend Modes pt. 2
Layer Comps
Adjustment Layers
Layer Styles
Auto Align Layers
Cropping
Crop ToolCrop & Rotate
Crop Perspective
Navigation
NavigateNavigator Panel
Color Tools
Color PalettesCreate Swatches
Color Picker & Eyedropper
Selections
Selection ToolsQuick Select
Magic Wand
Marquees & Strokes
Paste Into & Invert
Feather & Anti-alias
Save & Load
Transformation
Content-Aware Scale pt. 1Content Aware Scale pt. 2
Transform
Free Transform
Warp Tool
Arbitrary Rotation
Adjustments
Adjustments PanelCurves
Levels
Vibrance Adjustment
Color Correction
Replace ColorVariations
Match Color
Red Eye
Masks
Mask PanelVector Masks
Clipping Masks
Quick Mask
Layer Masks
Refine Edge
Type
Type ToolsFonts & Colors
Type on a Path
Type as a Mask
Edit Type
Rasterize Type
Painting
GradientsDodge / Burn & Sponge
Smudge / Sharpen & Blur
The Eraser Tools
Define Patterns
Brushes
Mouse vs. TabletBrush Preview
Define Brushes
Brush Dynamics
Drawing
Pen ToolEdit Paths
Vector Shapes
Filters & Effects
Filter GallerySmart Filters
Blurs
Textures
Lighting Effects
Styles
Liquefy
Fade
Smart Objects
Smart Objects pt. 1Smart Objects pt. 2
Guides & Annotation
GuidesNotes Annotation
Camera Raw
Camera Raw pt. 1Camera Raw pt. 2
Retouching
Retouching ToolsClone Stamp
Clone with Two Images
Clone Source
Patch Tool
Dust & Scratches
History
HistoryArt History Brush
History Brush
Vanishing Point
Vanishing Point pt. 1Vanishing Point pt. 2
Channels
The Channels PaletteAlpha Channels
Actions
Record ActionsPlay Actions
Automation
Batch RenamePDF Presentation
Droplets
Contact Sheets
Picture Package
Web Photo Gallery
Saving & Exporting
Save DocumentsFlatten
Export to Illustrator
Scanning
Scan in ArtworkOutput
PrintingFile Formats
Web Preparation
The Slice ToolSlice Options
Save for Web
Resources
MagazinesWebsites
Project: Orbiting Mothership
Mothership OverviewOrbiting Mothership pt. 1
Orbiting Mothership pt. 2
Orbiting Mothership pt. 3
Orbiting Mothership pt. 4
Orbiting Mothership pt. 5
Course Information:
Course: Adobe Photoshop CS4
Author: Dwayne Ferguson
Release Date: 2009-01-16
Duration: 9 hrs / 141 tutorials
About VTC
The Virtual Training Company (VTC) started in Californias Silicon Valley in 1996, and is one of the leading online training providers in the web today. Theyve built up a library of more than 1000 video training courses, which you can access entirely for $30/month.
Heres what some of their satisfied customers have to say:
This site is basically going to save my semester. I will be using it beyond that though. What a great site. Worth every penny. Thank you so much for your product.
- Kevin
My company recently switched out to Outlook 2010, gave us a pamphlet of a few pages covering the very basics. We were lost! Especially coming from Groupwise/Novell. That said, Laurie Ulrich Fuller is an outstanding instructor. This has been the simplest way to explain Outlook 2010. Loved her!!! She made my life easier. Thanks a million!!!
- Celia Esquivel
Geoff Blake performed superbly on introducing Acrobat forms: clear, well-organized and instructive on the basics of the process. Bravo! I would highly recommend this course to anyone searching for a basic introduction to Acrobat forms.
- Brad B.
Over the course of a few weeks, I received approximately 60 hours of on-line Project Managent training from Vanina Mangano through VTC. The training was for Project Management certification exam and I took 3 courses PMBOK (a bootcamp like course), PMBOK Schedule and PMBOK Risk. Vanina really prepared me for the test. I particularly found the Schedule and Risk Bundles instructive in expanding my intuitive understanding of these overall processes. Vanina did a great job of performing the training and her commentary and explanations were right on. Vaninas melodic voice is easy to listen to - she motivates and encourages study. I passed the Project Management Certification on my first try after completing this course of study. Top qualities: Great Results, Personable, Good Value
- Annemarie DeMarco
I joined on the 20th August 2010 to your program and Im most impressed. I need to learn Excel for my job and at 64 years old I never thought I would ever be able to conquer spreadsheets etc. I have been practicing along with your tutorials since Saturday and I cant believe how quickly I am picking it up. The online course is worth every penny and I will be recommending you and your team for the excellent service and content to anyone who will listen. Magic! By the way Im not that great on a computer either so if I can do it, then its a doddle for anyone else!
- Barbara Richards
Are you ready to be part of this community of satisfied learners?
[Become a VTC.com Member TODAY!]
Get complete access to ALL the VTC Online University courses for $30/month
[Become a VTC.com Member TODAY!]
Get complete access to ALL the VTC Online University courses for $30/month
Are you ready to start your Adobe Photoshop CS4 Online Training for Beginners? Then sign up for a VTC.com membership today!
Working with Adobe Premiere Pros Basic 3D Video Effect PART 2
Next, we are going to apply the Basic 3D video effect to the title clip that was just placed on the Timeline.
Go to the Effects window (choose Window > Effects from the main menu if you do not see it). You will find the Basic 3D video effect under Video Effects > Perspective. Once you find it, click and drag it down onto the basic_3D title clip on the Video 1 track of your Timeline in order to apply the video effect.

Make sure that your title clip is still selected, then go to the Effect Controls window (choose Window > Effect Controls if you do not see it). You should be able to see Basic 3D under Video Effects. Click the right-facing arrowhead beside the word Basic 3D in order to see the effects properties. You will see 5 items: Swivel, Tilt, Distance to Image, Specular Highlight and Preview.

Lets work with the Swivel property first. The Swivel property controls the clips horizontal rotation. It has two values that you can work with: the number of rotations and the rotation angle.
Make sure that the title clip on your Timeline is still selected. Then in the Effect Controls window, drag the playhead to the leftmost edge of the clips timeline. Then click on the Toggle Animation button beside the word Swivel (its the icon that looks like a stopwatch). This will turn on keyframing for the Swivel property and will automatically add one keyframe to where the playhead is positioned.

Then move the playhead forward by about 1 second and add another keyframe by clicking on the Add Keyframe button. Keep the playhead over that keyframe and change the Swivel propertys angle value. The angle value is the one to the right of the x. Right now, it should be 0.0. Click on it and input a value of 80.

Then move the playhead forward once again by about 1 second and add another keyframe. On this keyframe, change the Swivel propertys angle back to zero.

By now, if you play your movie on the program monitor, you should have something like this:
go back to Working with Adobe Premiere Pros Basic 3D Video Effect PART 1
continue to Working with Adobe Premiere Pros Basic 3D Video Effect PART 3
Read more »
Go to the Effects window (choose Window > Effects from the main menu if you do not see it). You will find the Basic 3D video effect under Video Effects > Perspective. Once you find it, click and drag it down onto the basic_3D title clip on the Video 1 track of your Timeline in order to apply the video effect.
Make sure that your title clip is still selected, then go to the Effect Controls window (choose Window > Effect Controls if you do not see it). You should be able to see Basic 3D under Video Effects. Click the right-facing arrowhead beside the word Basic 3D in order to see the effects properties. You will see 5 items: Swivel, Tilt, Distance to Image, Specular Highlight and Preview.
Lets work with the Swivel property first. The Swivel property controls the clips horizontal rotation. It has two values that you can work with: the number of rotations and the rotation angle.
Make sure that the title clip on your Timeline is still selected. Then in the Effect Controls window, drag the playhead to the leftmost edge of the clips timeline. Then click on the Toggle Animation button beside the word Swivel (its the icon that looks like a stopwatch). This will turn on keyframing for the Swivel property and will automatically add one keyframe to where the playhead is positioned.
Then move the playhead forward by about 1 second and add another keyframe by clicking on the Add Keyframe button. Keep the playhead over that keyframe and change the Swivel propertys angle value. The angle value is the one to the right of the x. Right now, it should be 0.0. Click on it and input a value of 80.
Then move the playhead forward once again by about 1 second and add another keyframe. On this keyframe, change the Swivel propertys angle back to zero.
By now, if you play your movie on the program monitor, you should have something like this:
go back to Working with Adobe Premiere Pros Basic 3D Video Effect PART 1
continue to Working with Adobe Premiere Pros Basic 3D Video Effect PART 3
Friday, January 23, 2015
Working with Adobe Premiere Pros Basic 3D Video Effect PART 5
In the last part of this tutorial, we are going to add the spotlight effect that you may have noticed in the preview video from the first part of this exercise. Lets take another look. As the text tilts and swivels, you should see a glare that moves on its surface:
Lets now learn how to add that effect.
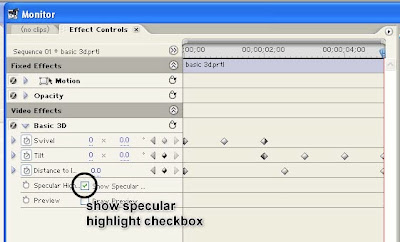
Make sure that the "Basic 3D" title clip on the Timeline is still selected. Then in the Effect Controls window, make sure that the Show Specular Highlight property of the Basic 3D video effect is checked. This will add that spotlight effect you saw in the preview above.
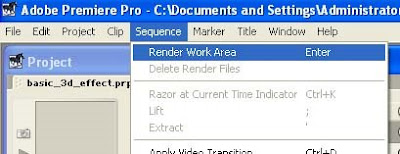
To be able to preview the Specular Highlight, you will need to render your sequence. Choose Sequence > Render Work Area from the main menu in order to render a preview.
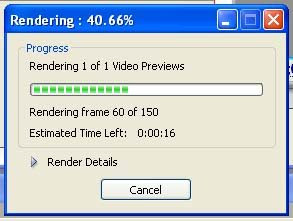
Then just wait for Premiere to finish rendering.
Once rendering is finished, you should be able to view your sequence in the Program view of the Monitor window and see the specular highlight applied.
And that concludes this tutorial on Working with Adobe Premiere Pros Basic 3D Video Effect.
go back to Working with Adobe Premiere Pros Basic 3D Video Effect PART 4
Read more »
Lets now learn how to add that effect.
Make sure that the "Basic 3D" title clip on the Timeline is still selected. Then in the Effect Controls window, make sure that the Show Specular Highlight property of the Basic 3D video effect is checked. This will add that spotlight effect you saw in the preview above.
To be able to preview the Specular Highlight, you will need to render your sequence. Choose Sequence > Render Work Area from the main menu in order to render a preview.
Then just wait for Premiere to finish rendering.
Once rendering is finished, you should be able to view your sequence in the Program view of the Monitor window and see the specular highlight applied.
And that concludes this tutorial on Working with Adobe Premiere Pros Basic 3D Video Effect.
go back to Working with Adobe Premiere Pros Basic 3D Video Effect PART 4
Subscribe to:
Posts (Atom)