Showing posts with label 1. Show all posts
Showing posts with label 1. Show all posts
Thursday, March 12, 2015
Announcing Version 1 9 of the NET Library for Google Data APIs
We have released version 1.9 of the .NET Library for Google Data APIs and it is available for download.
This version adds the following new features:
- support for 3-legged OAuth
- two new sample applications: BookThemAll (mashup of Calendar and Provisioning APIs) and UnshareProfiles (showcasing a new feature of the Google Apps Profiles API)
- updates to the Content for Shopping API to implement 20+ new item attributes
- support for new yt:rating system and Access Control settings to the YouTube API
This new version also removes the client library for the deprecated Google Base API and fixes 20 bugs.
For more details, please check the Release Notes and remember to file feature requests or bugs in the project issue tracker.
 | Claudio Cherubino profile | twitter | blog Claudio is a Developer Programs Engineer working on Google Apps APIs and the Google Apps Marketplace. Prior to Google, he worked as software developer, technology evangelist, community manager, consultant, technical translator and has contributed to many open-source projects, including MySQL, PHP, Wordpress, Songbird and Project Voldemort. |
Sunday, February 15, 2015
C program to find sum of series 1 2 3 n

#include<iostream.h>
#include<conio.h>
void main()
{
clrscr();
int i,n,sum=0;
cout<<"1+2+3+......+n";
cout<<"
Enter the value of n:";
cin>>n;
for(i=1;i<=n;++i)
sum+=i;
cout<<"
Sum="<<sum;
getch();
}
Saturday, February 14, 2015
C program to find sum of series 1 2 3 2 5 2 n 2
#include<iostream.h>
#include<conio.h>
void main()
{
clrscr();
int n,i;
long sum=0;
cout<<"1^2+3^2+5^2+......+n^2
Enter Value of n:";
cin>>n;
for(i=1;i<=n;i+=2)
sum+=(i*i);
cout<<"
Sum of given series is "<<sum;
getch();
}
#include<conio.h>
void main()
{
clrscr();
int n,i;
long sum=0;
cout<<"1^2+3^2+5^2+......+n^2
Enter Value of n:";
cin>>n;
for(i=1;i<=n;i+=2)
sum+=(i*i);
cout<<"
Sum of given series is "<<sum;
getch();
}
Tuesday, February 3, 2015
The Walking Dead Season 1 Download free games
The Walking Dead
Season 1
Android game full version
Free Games

The Walking Dead Android game is Based on comic book. The most popular comic story and the most popular Tv Series is now available as a game for smartphones and tablets. The walking dead is a story about a group of survivals in zombie apocalypse . A wonderful story of survival. Fight against Zombies. The game has very gripping story , graphics .


Download full game from Google PlayStore
Saturday, January 31, 2015
LG Latest announced G Pad 7 0 8 0 10 1 inch tablets series latest news
LG Announced Latest Series of Tablets G Pad 7 ,8 ,10.1 inch.
LG is prepared to announced the new GPAD tablets series in Europe biggest tech trade show named MedPI 2014 which is going to held in Monaco from May 13 to May 16. The new G Pad tablet series contain G Pad 7.0 , G Pad 8.0 and G Pad 10.1. The tablet series will appear with LG s UX series like QPair 2.0 and Knock Code however other spec were not revealed by officials. LG G Pad most probably will appear as mid range Tablets and in 3 different colors , blue, white and black as leaked image shows.
 |
| upcoming LG G PAD Tabs |
Q Pair 2.0 is an app which allow user to call and receive text on tablet PC and the Knock Code will allow user power on and unlock LG smartphones entering a personalized ‘knock’ pattern on the smartphone’s display.
Thursday, January 29, 2015
Creating a Flex AIR Annotator app Part 1
Today we will start making a new program called KirAnnotator.
KirAnnotator - a light software used for adding annotations, arrows, comments to a picture, imported by the user.
This kind of program can be used for many needs - whether it is a web developer, trying to point out flaws in a site design by highlighting specific spots in the screenshot, or just a casual user drawing attention to a point of interest on a site screenshot, on a map, or any other picture.
Just like all of my Flex AIR programs, Im making this one in FlashDevelop.
Open FD, create new Flex 4 AIR Project. I set my projects name as KirAnnotator.
In Main.mxml file, lets set up our basic layout.
Create a VGroup containing an HBox and a Canvas. The Canvas contains a Box (with 100% dimensions), which basically acts as a background for the contnet. Set the canvas scroll policies to "on", and the inside boxs vertical and horizontal aligns to middle and center.
Inside the last box, add another box with an id of drawArea. Set its dimensions to 300 and 200. This is where the image will be located, as well as anything that the user draws. For now its just a white rectangle.
Lets add some text to it, which will appear on programs launch - it should tell the user to import a picture.
Now, in the first HBox in the VGroup, add 2 IconButton objects. Those are our custom components, which I will get to soon:
You can see that I set the icon properties of the wto placeholder icon buttons to bubble.png picture located in the lib folder of the project. The picture is taken from a free icon set found on the internet:

Put it in the lib folder, name it bubble.png.
Now, because IconButton is not an existing control, we have to create the component first.
Before we do that, we need to set namespace for the custom components in the root tags. While were at it, set showStatusBar to false, creationComplete event handler to init(), minWidth and minHeight to 400 and width and height to 600 and 500.
Create a new file in the same directory as Main.mxml. Call it IconButton.mxml.
The class uses a custom skin called iconSkin.
Create a new file called iconSkin.mxml:
Now return to the main mxml file. Lets add one more thing - shadow drop effect for the drawArea object. Add Script tags and create an init() function which sets drawAreas filters to an array of 1 element - DropShadowFilter object.
And thats all for today.
Full code:
Thanks for reading!
Read more »
KirAnnotator - a light software used for adding annotations, arrows, comments to a picture, imported by the user.
This kind of program can be used for many needs - whether it is a web developer, trying to point out flaws in a site design by highlighting specific spots in the screenshot, or just a casual user drawing attention to a point of interest on a site screenshot, on a map, or any other picture.
Just like all of my Flex AIR programs, Im making this one in FlashDevelop.
Open FD, create new Flex 4 AIR Project. I set my projects name as KirAnnotator.
In Main.mxml file, lets set up our basic layout.
Create a VGroup containing an HBox and a Canvas. The Canvas contains a Box (with 100% dimensions), which basically acts as a background for the contnet. Set the canvas scroll policies to "on", and the inside boxs vertical and horizontal aligns to middle and center.
<s:VGroup width="100%" height="100%" gap="0">
<mx:HBox backgroundColor="#ccccdd" width="100%" height="68">

</mx:HBox>
<mx:Canvas width="100%" height="100%" horizontalScrollPolicy="on" verticalScrollPolicy="on">
<mx:Box backgroundColor="#eeeeee" width="100%" height="100%" verticalAlign="middle" horizontalAlign="center" horizontalScrollPolicy="off" verticalScrollPolicy="off">

</mx:Box>
</mx:Canvas>
</s:VGroup>
Inside the last box, add another box with an id of drawArea. Set its dimensions to 300 and 200. This is where the image will be located, as well as anything that the user draws. For now its just a white rectangle.
Lets add some text to it, which will appear on programs launch - it should tell the user to import a picture.
Now, in the first HBox in the VGroup, add 2 IconButton objects. Those are our custom components, which I will get to soon:
<s:VGroup width="100%" height="100%" gap="0">
<mx:HBox backgroundColor="#ccccdd" width="100%" height="68">
<custom:IconButton icon="@Embed(../lib/bubble.png)" toolTip="Annotation" enabled="true" />
<custom:IconButton icon="@Embed(../lib/bubble.png)" toolTip="Annotation" enabled="false" />
</mx:HBox>
<mx:Canvas width="100%" height="100%" horizontalScrollPolicy="on" verticalScrollPolicy="on">
<mx:Box backgroundColor="#eeeeee" width="100%" height="100%" verticalAlign="middle" horizontalAlign="center" horizontalScrollPolicy="off" verticalScrollPolicy="off">
<mx:Box id="drawArea" backgroundColor="#ffffff" width="300" height="200">
<s:VGroup width="100%" height="100%" horizontalAlign="center" verticalAlign="middle">
<s:Label fontSize="24" color="#444444">Welcome to KirAnnotator.</s:Label>
<s:Label fontSize="24" color="#444444">Start by</s:Label>
<s:Label fontSize="24" color="#6666ff">importing a picture!</s:Label>
</s:VGroup>
</mx:Box>
</mx:Box>
</mx:Canvas>
</s:VGroup>
You can see that I set the icon properties of the wto placeholder icon buttons to bubble.png picture located in the lib folder of the project. The picture is taken from a free icon set found on the internet:
Put it in the lib folder, name it bubble.png.
Now, because IconButton is not an existing control, we have to create the component first.
Before we do that, we need to set namespace for the custom components in the root tags. While were at it, set showStatusBar to false, creationComplete event handler to init(), minWidth and minHeight to 400 and width and height to 600 and 500.
<s:WindowedApplication xmlns:fx="http://ns.adobe.com/mxml/2009"
   xmlns:s="library://ns.adobe.com/flex/spark"
   xmlns:mx="library://ns.adobe.com/flex/mx"
   xmlns:custom="*"
   showStatusBar="false"
   creationComplete="init();" minWidth="400" minHeight="400"
   width="600" height="500">
Create a new file in the same directory as Main.mxml. Call it IconButton.mxml.
<?xml version="1.0" encoding="utf-8"?>
<s:Button xmlns:fx="http://ns.adobe.com/mxml/2009" xmlns:s="library://ns.adobe.com/flex/spark" xmlns:mx="library://ns.adobe.com/flex/mx" skinClass="iconSkin">

<fx:Metadata>
[Style(name="icon",type="*")]
</fx:Metadata>

</s:Button>
The class uses a custom skin called iconSkin.
Create a new file called iconSkin.mxml:
<?xml version="1.0" encoding="utf-8"?>
<s:SparkSkin name="iconSkin"
        xmlns:fx="http://ns.adobe.com/mxml/2009"
        xmlns:s="library://ns.adobe.com/flex/spark"
        minWidth="68" minHeight="68"
        alpha.disabled="0.5">

    <s:states>
        <s:State name="up" />
        <s:State name="over" />
        <s:State name="down" />
        <s:State name="disabled" />
    </s:states>

    <fx:Metadata>
        [HostComponent("spark.components.Button")]
    </fx:Metadata>

    <s:Rect width="68" height="68" alpha.up="0" alpha.over="0.4" alpha.disabled="0">
<s:fill>
<s:SolidColor color="#ffffff"/>
</s:fill>
</s:Rect>
<s:BitmapImage source="{hostComponent.getStyle(icon)}" top="2" right="2" left="2" bottom="2" alpha.disabled="0.5" />

</s:SparkSkin>
Now return to the main mxml file. Lets add one more thing - shadow drop effect for the drawArea object. Add Script tags and create an init() function which sets drawAreas filters to an array of 1 element - DropShadowFilter object.
<fx:Script>
<![CDATA[
import flash.filters.DropShadowFilter;

private function init():void{
drawArea.filters = [new DropShadowFilter(4, 60, 0, 0.7, 10, 10, 1, 3)];
}
]]>
</fx:Script>
And thats all for today.
Full code:
<?xml version="1.0" encoding="utf-8"?>
<s:WindowedApplication xmlns:fx="http://ns.adobe.com/mxml/2009"
   xmlns:s="library://ns.adobe.com/flex/spark"
   xmlns:mx="library://ns.adobe.com/flex/mx"
   xmlns:custom="*"
   showStatusBar="false"
   creationComplete="init();" minWidth="400" minHeight="400"
   width="600" height="500">

<fx:Declarations>
<!-- Place non-visual elements (e.g., services, value objects) here -->
</fx:Declarations>

<fx:Script>
<![CDATA[
import flash.filters.DropShadowFilter;

private function init():void{
drawArea.filters = [new DropShadowFilter(4, 60, 0, 0.7, 10, 10, 1, 3)];
}
]]>
</fx:Script>

<s:VGroup width="100%" height="100%" gap="0">
<mx:HBox backgroundColor="#ccccdd" width="100%" height="68">
<custom:IconButton icon="@Embed(../lib/bubble.png)" toolTip="Annotation" enabled="true" />
<custom:IconButton icon="@Embed(../lib/bubble.png)" toolTip="Annotation" enabled="false" />
</mx:HBox>
<mx:Canvas width="100%" height="100%" horizontalScrollPolicy="on" verticalScrollPolicy="on">
<mx:Box backgroundColor="#eeeeee" width="100%" height="100%" verticalAlign="middle" horizontalAlign="center" horizontalScrollPolicy="off" verticalScrollPolicy="off">
<mx:Box id="drawArea" backgroundColor="#ffffff" width="300" height="200">
<s:VGroup width="100%" height="100%" horizontalAlign="center" verticalAlign="middle">
<s:Label fontSize="24" color="#444444">Welcome to KirAnnotator.</s:Label>
<s:Label fontSize="24" color="#444444">Start by</s:Label>
<s:Label fontSize="24" color="#6666ff">importing a picture!</s:Label>
</s:VGroup>
</mx:Box>
</mx:Box>
</mx:Canvas>
</s:VGroup>

</s:WindowedApplication>
Thanks for reading!
Sunday, January 25, 2015
How to Install Universal Uberoid 12 1 on Wm8650 Wondermedia Android Tablets
Tutorial How to Install Universal Uberoid 12.1 on Wm8650 Wondermedia Android Tablets Step By Step Guide .
This flashing procedure will work only on wm8650 Tablet PC . For other Wondermedia CPU the method is bit different .However Uberoid 12.1 is best option for all wondermedia Tablets.
First of all Disassemble your tablet to check what CPU / Chipset does your tablet have.
Step 2. Extract files using winzip or winrar.
Step 3. Insert Empty Memory Card into Computer.
Step4. Open Folder and find Uberoid Tool WM8650 v1.02. by diabetu . Double click will open software as shown in image.
Step 5. Select SD card drive and click on apply selection .A pop up window will be open select yes to format SD card.
Step 6. This is important step . Proceed carefully. Select what is color of power led .(When you press power button on Wondermedia tablets a small led Light turns on . There are two kind of power led colors in Wondermedia tablets . A green and blue. choose what color you see on tablet. as shown in image.

You are done .
Find out how to disassemble Wondermedia Tablets.
Step 1.Download Universal Uberoid 12.1
Step 2. Extract files using winzip or winrar.
Step 3. Insert Empty Memory Card into Computer.
Step4. Open Folder and find Uberoid Tool WM8650 v1.02. by diabetu . Double click will open software as shown in image.
 |
| wm8650 SD burning tool |
Step 5. Select SD card drive and click on apply selection .A pop up window will be open select yes to format SD card.
Step 6. This is important step . Proceed carefully. Select what is color of power led .(When you press power button on Wondermedia tablets a small led Light turns on . There are two kind of power led colors in Wondermedia tablets . A green and blue. choose what color you see on tablet. as shown in image.
Step 7. Click on Transfer . Firmware will be start burning on SD card. It will take upto 2 minutes. when complete you will see message as shown below.
Step 8. Remove SD card , Turn off tablet pc , insert SD Card into Android Tablet . Press Power button . Tablet will detect firmware from SD card and will be start upgrading . Wait for few minutes . After 5 minutes a message will be appear on tablet Please remove memory card, remove sd card . Tablet Pc will be restart it self. First boot will take upto 3 minutes.
You are done .
Note: Do not remove Memory Card during flash. Make sure to charge battery more then 60 %. Power failure during flash may result broken or dead tablet.
Friday, January 23, 2015
A Subtle Java 1 5 Gotcha
I couldnt resist creating this very short, dorky and entirely programming-focused entry today. If you are not a software engineer, read no further. You have been warned.
I recently ran across a subtle way a handy Java 1.5 feature can sneak up and cause issues. Perhaps if I had spent more time pouring over the specs & documentation, it wouldve been very obvious, but alas, it definitely caught me by surprise. The problem was a null Pointer Exception (NPE) which I tracked down to the following line of code:
int id = map.get(key)
The obvious culprit was that HashMap named map was null, but as I stepped through the code, I found to my surprise that it wasnt. Neither was key, for that matter. So how the hell was I getting an NPE? Take a look at the declaration of map:
Map<String,Integer> map = new HashMap<String,Integer>();
Note how the values in map are Integer objects, but Im setting the result of the get call to a primitive int. In Java 1.5, this is allowed as Java will automatically unbox the Integer into an int. But what happens if the value returned by get is null? Well, the auto unboxing cant convert that to any int value - returning some default value like 0 or -1 would be very deceiving - so you get a big old NPE.
Moral of the story: auto boxing and unboxing are very handy features to keep your code clean and readable, but keep NPEs in mind every time you use them.
Read more »
I recently ran across a subtle way a handy Java 1.5 feature can sneak up and cause issues. Perhaps if I had spent more time pouring over the specs & documentation, it wouldve been very obvious, but alas, it definitely caught me by surprise. The problem was a null Pointer Exception (NPE) which I tracked down to the following line of code:
int id = map.get(key)
The obvious culprit was that HashMap named map was null, but as I stepped through the code, I found to my surprise that it wasnt. Neither was key, for that matter. So how the hell was I getting an NPE? Take a look at the declaration of map:
Map
Note how the values in map are Integer objects, but Im setting the result of the get call to a primitive int. In Java 1.5, this is allowed as Java will automatically unbox the Integer into an int. But what happens if the value returned by get is null? Well, the auto unboxing cant convert that to any int value - returning some default value like 0 or -1 would be very deceiving - so you get a big old NPE.
Moral of the story: auto boxing and unboxing are very handy features to keep your code clean and readable, but keep NPEs in mind every time you use them.
PART 1 Creating a new Flash document and choosing a workspace layout Getting started with Flash CS5
- PART 1: Creating a new Flash document and choosing a workspace layout
- PART 2: The document window, the toolbar, and drawing on the stage with the brush tool
- PART 3: Saving your Flash document and knowing the difference between the FLA and SWF files
Welcome to the Getting started with Flash CS5 tutorial series by flashpotential.com. In the first part of this series, where going to learn how to create a new document, and well also get to know a little bit about workspace layouts.
Step 1 - Creating a new Flash document
Launch the Flash CS5 application.
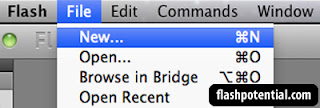
To create a new document, go to the main menu and choose File > New.
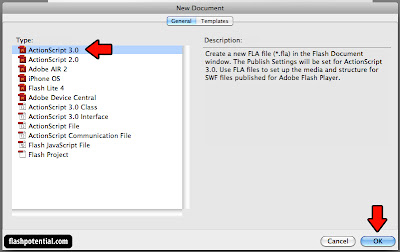
Then from the New Document window, choose ActionScript 3.0, and click OK. Click on the image below to enlarge.
You should now see your new Flash document. Click on the image below to enlarge.

This is your workspace. Its made up of different windows that each have specific functions. Youll see some of those windows highlighted in the image below. Click on the image below to enlarge.
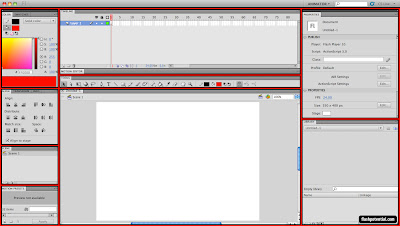
The windows that you see here are just some of the windows that you can work with when you open up a Flash document. Youve got the toolbar, the timeline, the properties inspector, etc... But we wont go through each of them right now. There are a lot! Well learn more about them in the other lessons.
These windows that make up your workspace can be rearranged. You can move them to different locations, adjust the size, you can close some of them, or you can bring up other windows that are not yet visible, etc... The windows that you have open and the way you arrange these windows is referred to as your workspace layout. You can customize your workspace layout or you can choose from any of the preset layouts that are available.
Step 2 - Choosing a workspace layout
To choose a new layout, go to the main menu and choose Window > Workspace. Here youll see all the available layout presets that are available. Youve got Animator, Classic, Debug, Designer, Developer, Essentials and Small Screen.
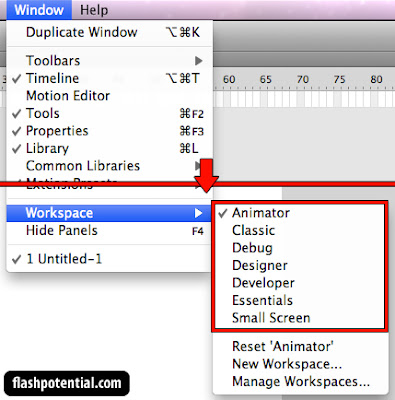
Click on the choices to see how they look like. Youve got the Animator layout, which gives importance to the windows that are most often utilized when one is creating a Flash animation project. Theres the Classic layout, which looks like the default layout of older versions of Flash. Youve also got the Small Screen layout, which creates a workspace ideal for monitors with lower resolutions. Each workspace is designed to fit the needs of a certain type of user. Its a lot like how you fix your own study table or your room at home. You arrange your things in such a way that makes it easier for you to work, relax or play.
Step 3 - Moving, collapsing, expanding and adjusting the size of windows
If you wish to move your windows around, you can do so by clicking on the window tabs and dragging the windows to the desired location.
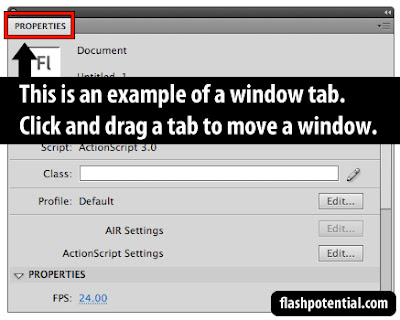
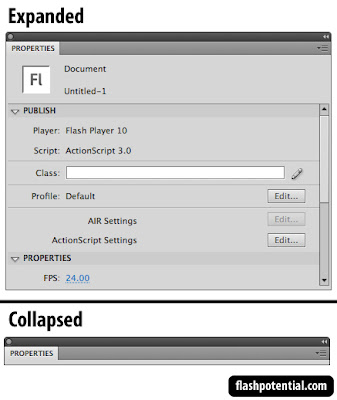
If you wish to collapse or minimize a window, just double-click the tab. To expand a window again, then just double-click the tab again.
If you wish to adjust the size of a window, place your mouse pointer over the edge of the window until the pointer turns into a double-headed arrow.
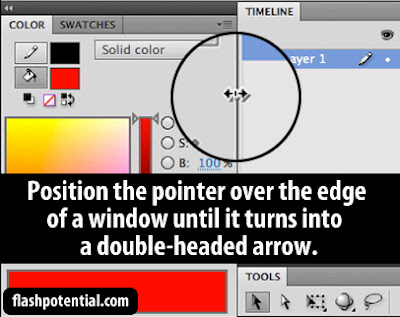
And then click and drag to adjust the windows size. You can adjust from the left or right sides to change the width. And you can also adjust from the top or bottom edges to change the height.
Go ahead and try moving, resizing, collapsing and expanding the windows in your workspace. Dont worry about messing up the layout. Well fix that in the next step.
Step 4 - Resetting a workspace layout
If you find that youve messed up your workspace layout to a point where its quite difficult for you to work, you can reset everything by going to Window > Workspace > Reset [Active Layout].
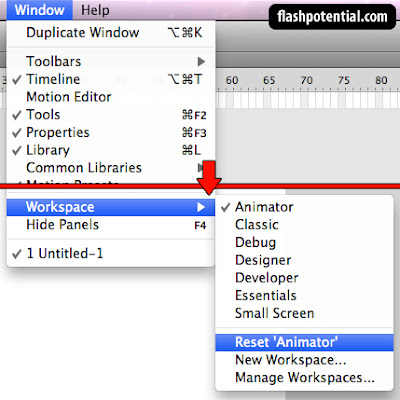
This is going to reset whatever layout is currently active. So if youre using the Animator layout, its going to reset your workspace back to the default Animator layout, and make everything neat and tidy again.
In part 2 of the Getting started with Flash CS5 tutorial series, were going to draw some artwork on the stage.
The document window, the toolbar, and drawing on the stage with the brush tool - Getting started with Flash CS5 - PART 2: NEXT >>
Subscribe to:
Posts (Atom)